
How to create a flex schedule, assign the schedule to seats, and assign occupants to schedules.
Flex schedules are used to assign multiple employees to one seat on a set schedule. For example, Employee A is assigned to Seat 100 every Monday, Wednesday and Friday. Employee B is assigned to the same seat every Tuesday and Thursday.
There are three parts to creating and assigning a flex schedule: 1. Creating the flex schedule 2. Adding the schedule to specific seats and 3. Assigning occupants to the schedule. To begin creating your flex schedule, follow the steps below.
Create A New Flex Schedule
- Navigate to the Locations tab.
- In the top menu, click on Flex Seating.
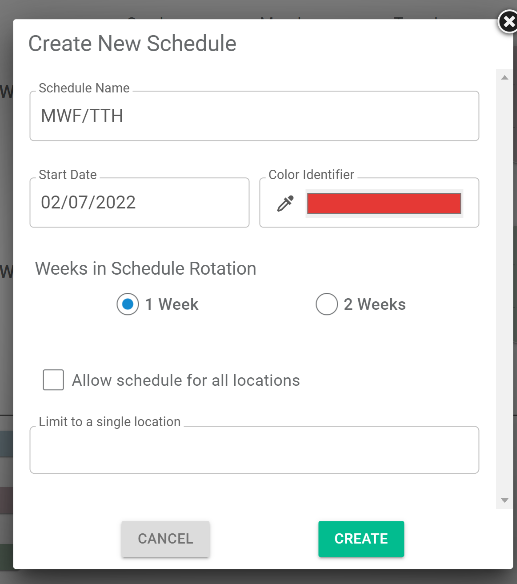
- Under the Seating Schedules header towards the top left, click the Create button.

- Enter a name for the schedule.
- We recommend naming schedules generically so that they may be reused for multiple occupants. For example: "MWF/TTH" is a great title for a schedule like the one described in the opening paragraph of this article.
- We recommend naming schedules generically so that they may be reused for multiple occupants. For example: "MWF/TTH" is a great title for a schedule like the one described in the opening paragraph of this article.
- Make sure the start date is set to today's date so that it is available for immediate use.
- Select a color to associate with the schedule.
- Once a schedule is assigned to a seat on the map, the seat displays in this color.
- Select a 1 or 2 week schedule rotation. For the MWF/TTH schedule, you would select 1 week.
- You can limit the schedule to be used at a specific location or you can allow it to be used at all locations across your organization.
- Unless there is an organizational reason to limit the use of this schedule, Maptician recommends checking the "Allow schedule for all locations" option.
- Click Create to finalize schedule creation.
Add Shifts to Schedule
Once you have created your schedule, shifts must be added. Think of each shift as an employee within the schedule. For example, in the schedule discussed above, we need to create one shift for Employee A (MWF) and one shift for Employee B (T/TH). To do this, follow these steps:
- Under the Seating Schedules menu, click the Add Shift button to the right of your newly created schedule.

- Enter a name for the shift. For example: MWF. Then click Create Shift.
- To the right, click on your newly created shift so that it highlights in blue. Now, designate which days/times this shift entails. For example, let's say this is our MWF shift, and our employee works a full day on each of those days. Within the calendar tool, click on Monday and select Full Day. Complete this same step for Wednesday and Friday, as well.
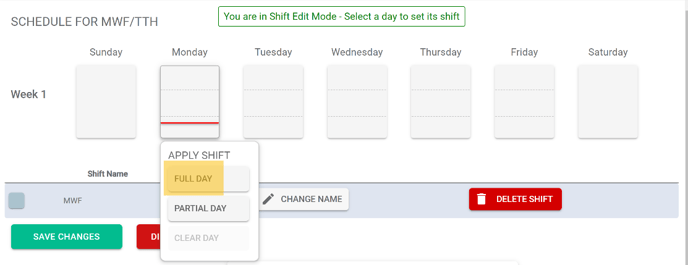
- Now add your second shift for Tuesday and Thursday. Apply either a full or partial day to each day.
- Click the green Save Changes button to save all changes to schedules and shifts.
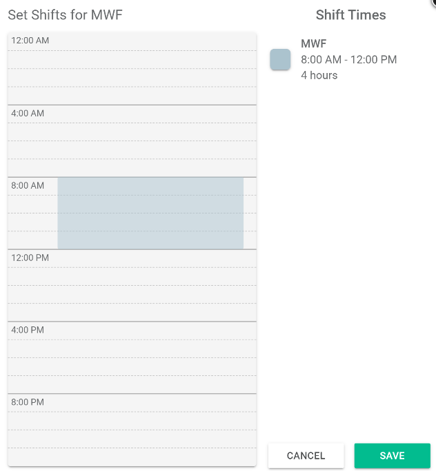
- The Partial Day option allows you to assign specific times an employee will be in the office on each day. When you select the Partial Day option, a calendar appears. You can click and drag on the calendar to specify the exact times the employee will be in the office on that day. In the example below, the employee has a partial day on Friday from 8 AM to 12 PM.
Assign The Flex Schedule To Seats
The next step in this process is to assign the schedule to seats on the map. To do this, follow the instructions below:
- Navigate to the Map Editor tab.
- Select the desired location and map to open.
- Once in the map, click on the seats you would like to assign schedules. You can select multiple seats at once by holding down the CTRL key on your keyboard and clicking on each seat.
- Navigate to the menu to the right, and within the Seat Usage drop down menu, select Flex.

- Save and close the map once the desired seats are set to Flex.
- Navigate to the Assignments tab.
- Open the desired map.
- Navigate to the Schedules tab towards the top right of the screen.
- Find the desired schedule you wish to assign to the seat and click Set Seats.
- Click on all of the seats you want to set to this schedule.

- Once you set schedules to the seats, you are now ready to assign occupants to the schedule.
Assign Occupants to Schedules
Before anyone is assigned to the schedule, the seats will be marked with how many people are needed to fill the schedule. If it says 0/2, that means two people total can be assigned to this seat and zero have be assigned so far.
- Select the Occupants tab (this is next to the Schedules tab).
- If you cannot find an employee, you may need to check the All Offices box.
- Once you find the occupant, drag and drop their profile image into the desired seat.
- A box appears with the different shifts. Select which shift the occupant should have and then click Save.
- The seat should now say 1/2. This means 1 out of 2 occupants has been assigned to the seat schedule.
- Repeat steps 2-3 to finish assigning occupants to the seat schedule.
- Once all schedules are assigned, save and close the map.